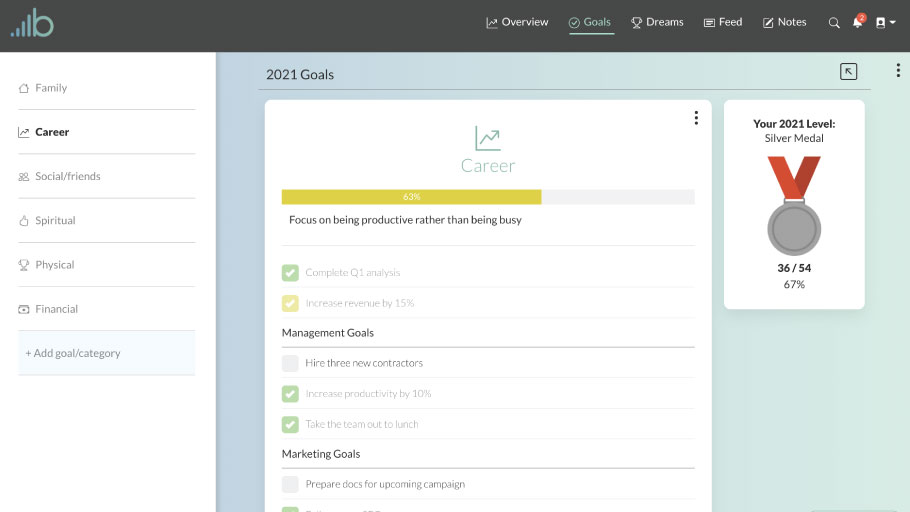
The brightyear.io goals page gives you the ability to set goals and tasks for any given year that you’d like to accomplish. In this article, we’ll walk through the basics of how to use the page on a desktop and on a phone, as well as best practices and common uses of the page. Let’s get started:
There are a few ways of using the goals page and how you use the page is up to you. A common and recommended practice of goal-setting is to set larger goals and then smaller tasks that all help you accomplish that goal. We’ve built that functionality within this page to do just that. Or, if you’d rather, you can create categories you’d like to improve in and set individual goals/tasks you’d like to do in the year to help you improve in that category. Example categories could include family, exercise, mental, social, emotional, spiritual, etc.
Desktop App Video
Mobile App Video
Create new goals/categories
To create a new goal or category on a desktop click on the “+ Add goal/category” button on the sidebar on the right. On a mobile device, you’d click the button on the top right, which pulls out a sidebar, and then click on that same “+ Add goal/category” button.

Then click the “New task” text to edit the goal/task. Then to add more goals/tasks click the “+ Add item” button on a desktop/laptop computer, or for mobile click the circular “+” button.
Task options
With each task, you create you have a few options you can select. If you click on the “vertical three dots” icon to the right of the task you’ll the task options dropdown will appear.
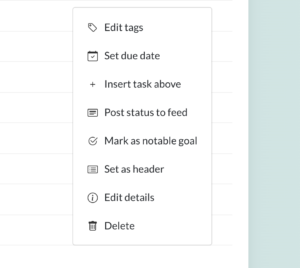
Edit tags
The first, and most important, is the “Edit tags” option. To get the best use out of this app be sure to thoroughly tag or label each task you create and complete. Thoroughly tagging your goals and tasks will help you better visualize the data behind your goals and show you what areas you are doing well in as well as areas you still need to improve in your goals. To add tags, click the “Edit tags” option and a modal will appear. Input the tag in the input and click the button or just hit “return” on your keyboard to add the tag. As you add tags to tasks you’ll notice a “recommended tags” section will appear that will give you recommendations based on previous tags you’ve attached to tasks.
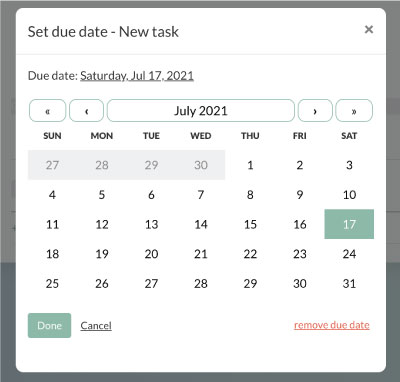
Set Due Dates
The next option is the “Set due date” option, which allows you to attach a date to the task on when you’d like to have the goal accomplished. If you’ve enabled notifications on your device you’ll be notified about the goal at the beginning of the week as well as the day of the task’s due date. This functionality is currently only available to users who are subscribed to the Premium plan.
Add Habit Tracking
If your goal is to do (or not do) something on a recurring basis, a great way to do this is by adding habit tracking to a goal/task. Once added, you’ll see an arrow icon next to the item’s dropdown options menu that, when clicked, will display a calendar view that you can use to track how often you’ve taken action on something. To log an event on the calendar simply click a date on the calendar. The date will then be highlighted, indicating you completed your habit for that day.
You can also designate how many times you’d like to do that goal per day, week, or month.
Currently, habit tracking is for Premium Subscribers.
Post to Feed
One critical part of completing the goals that you set is holding yourself accountable to your goals. We’ve built the Brightyear.io app to make it so that just about anything within the app is shareable on your Brightyear.io social feed. That being said, when you select the “Post status to feed” option, you can post the goal/task completion status and add any descriptive notes you’d like, and then post it so all your connections gain visibility into that goal/task. They can then react, comment, and follow up with you on the goal/task if they’d like.
Other
You can call out notable goals and tasks you complete by clicking the “Mark as notable accomplishment” option. This will change the color of the task checkmark button and completed notable accomplishments will be called out on the Overview page.
You can also further categorize your goals/tasks by clicking the “Set as header” option. This will change the item from a “task” to a header to help visually categorize the tasks you set.
Clicking the “Post status to feed” option will let you share the goal on your social feed with others. The post will look slightly different when the goal is complete as opposed to when it’s incomplete.
Lastly, you can delete the task/goal by clicking the “Delete task” option.
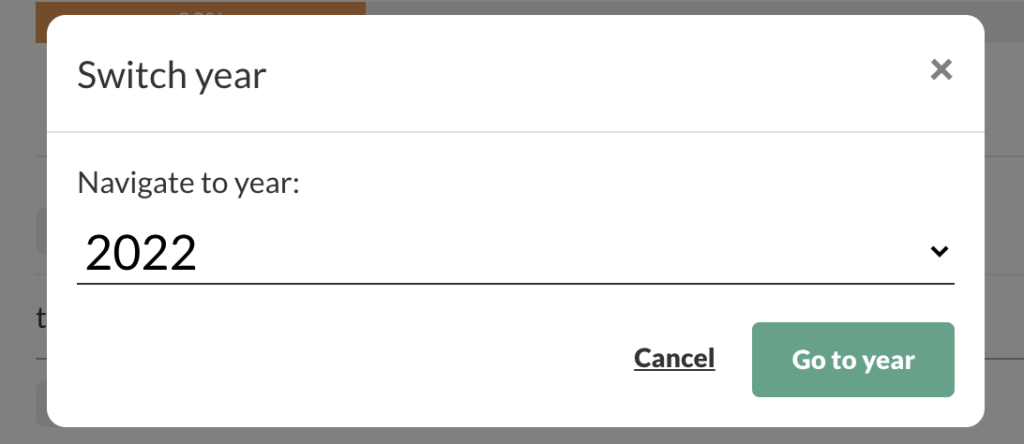
Selecting previous/future year’s goals
You can also plan out future year’s goals by navigating to different year pages. You can do this by clicking the calendar icon located at the top right of the page.
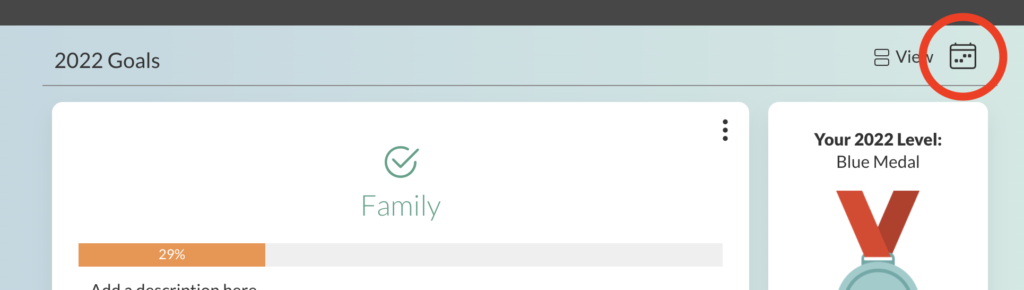
A modal will pop up where you can seelct a year you would like to create goals for:
Feel free to add previous years so you have more data to analyze on the Overview page.
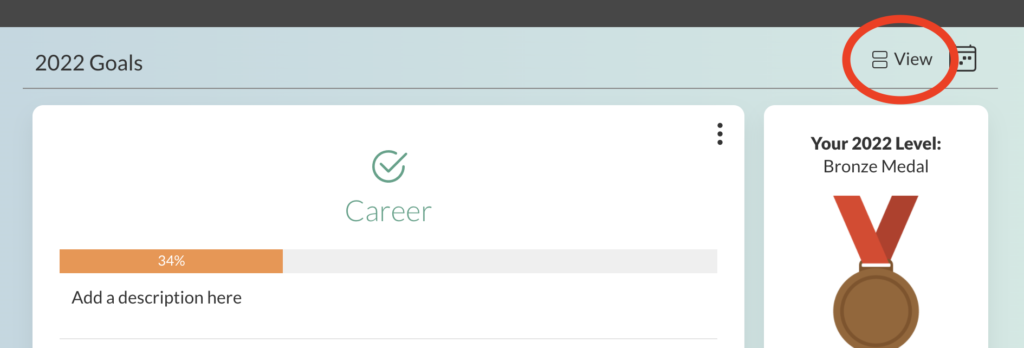
Board View vs List View
There is an icon located towards the top-right of your list of goals that allows Premium subscribers to switch between a list view (default view) and a board view, which is a common view for want users what to take on a specific project rather than complete a category or list of goals/tasks.
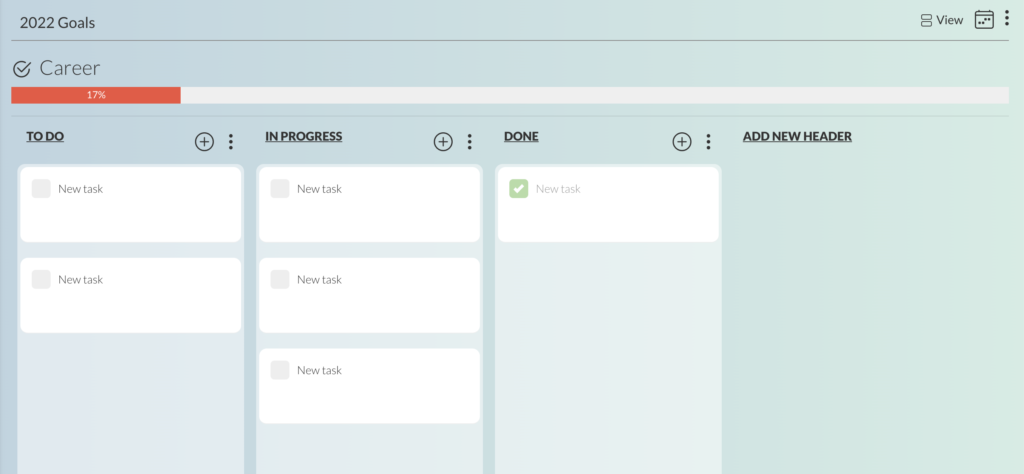
When toggled to the board view, your interface will look like this:
Add a category description
Lastly, you can add a description or notes to each goal/category you create. You can do this by clicking the “Add a description here” text where it is located on the page.
Want to see something else on the goals page?
If you have any questions, comments, or suggestions for the Goals page. Click the “Feedback” button at the bottom of the “Goals Page” to submit some feedback to us.
Enjoy!